Monday, April 29, 2013

Party Post Part Two

The surprise ball, the decor, the mix CD and the swag!

I love Pinterest! I have been collecting ideas for this party for sometime. I love decor items that have a large impact for little cost. I bought 2 rolls of wrapping paper and used what I had around the house, plus the few flowers from the dollar store. The paperwheel is a great trend right now. I love how this wall turned out. I think it will stay up for awhile. Grand total $3.


Tissue tassles are another cheap decor item and they look cute. I do wish I would have put in a bit of gold, though. Tutorial found here. Grand total $2.


The surprise ball I saw on the Design Mom blog and knew I wanted to do one. Super easy, super cute and fun. Simply using streamers, wrap items in layers until you have as many layers as you'd like.


As my guests responded that they were coming I asked them to give me a song that would be considered a favourite. I then made a mix CD for everyone to take home. I've been loving this. I have a happy emotional connection to this playlist on my computer and the CD copy in my car. Love these ladies!!!
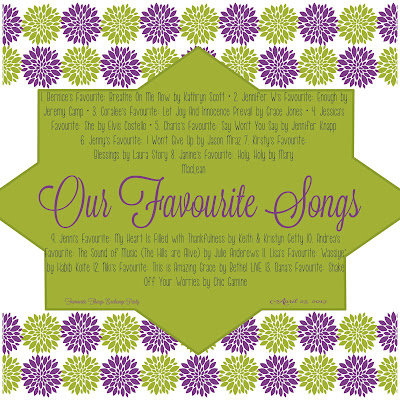
click to enlarge

What did everyone bring as their favourites? (blue ones I received)

  1. Style at Home magazine
  2. mini glass spice containers
  3. an almost favourite spatula - we heard a great story with this one!
  4. makeup bag with lipgloss
  5. Rocky Mountain bar soap
  6. zipper pouch and pen
  7. nail polish and Bible verses
  8. body wash, nail file and photo fridge magnet
  9. glass bowls and lip balm
  10. lip gloss
  11. tomato plants
  12. spa items and tea
  13. apricot scrub, flower seeds and tea
*sigh* It was great and I'm sad it's over. Oh well, there's always next year's party to plan. *wink* *wink*

PS Don't forget to enter the giveaway!


Friday, April 26, 2013

Party Post (part one) & An Announcement

Well, the party was a success. I think everyone had a good time and we all went away with lots of laughter, full tummies and great swag! Have you heard of a Favourite Things Exchange Party? Well, as soon as I read about it, I knew I had to throw one! It's been in my head for at least half a year and I finally had an "excuse" to throw one. Here's my invitation:


The Basic idea, everyone brings four of the same item (a favourite) and goes home with four different items from the other guests. The items varied from beauty products to kitchen ware, to magazines and even tomato plants.

the SWAG!

I knew that I wanted to make an item, so I sewed little zipper pouches and included my favourite pen inside. Tutorial/pattern here.


Vision Elite by Uni-ball

This represented several favourites for me

  1. sewing
  2. bags/purses
  3. learning new crafty things (I learned how to paper piece)
  4. mix tapes from my childhood - who doesn't love a good music mix?
Thanks, L, for the inspiration! Your zipper pouch is coming in the mail.

Laralee's zipper pouch

I also have one to giveaway. (Sorry, pen not included) Just leave a comment and in a week, I'll use the good ole random number generator to pick a winner.

WIN ME!

I should have taken a picture of the food. I asked everyone to bring a favourite snack/beverage etc. There was Soooooo much yummy food! I served Tazo Chai Lattes and Lay's Sea Salt and Pepper chips. 

Tazo Chai latte syrup purchased at WalMart
The ladies also surprised me with cake and ice cream. I specifically didn't put on the invitation that it was a birthday party. I didn't want anyone to feel like they needed to bring a gift or anything beyond their favourites... sneaky ladies, I had a lot of lovely gifts. Thanks, friends!!!!


We played a little game to begin the evening, and I was beginning to think we'd never get to the food or favourite items. There was great conversation over our favourite things. Everyone "won" a prize. I made a surprise ball and everyone passed it around until all the layers were revealed. A surprise ball is basically a streamer layered ball with goodies hidden in it. Each person unwraps the ball until they find a surprise and then it gets passed on. Nothing spectacular, just little novelties. 

Party Post Part Two will include details on the surprise ball, the party decor and the mix CD, but I want to share an announcement before this blog post gets too carried away....

Twila Mae Photography - yes this is from when we expecting Micah, but it's fun!
We are pregnant again! We're due Dec 31st and super thrilled.


Thursday, April 25, 2013

35 Years!

Today I am 35 years old. It's a good number on a great day. I have so much to be grateful for. It's currently 3:00 AM, I just changed two diapers and filled a bottle and a sippy cup (my boys are hard to say no to in the middle of the night - insert sheepish grin here) and I am wide awake. Tired, but awake. Today I get to celebrate and I am so grateful to be me. God has given me so much more than I deserve and much more than I had ever imagined. For your viewing pleasure and for my embarrassment, I give you a collage of pictures of me from the olden days (thanks Mom). I am looking forward to the next 35 years.


Woah! That all seems so long ago! I know you are expecting a party post and a giveaway, will you be patient for one more day? I'd really like my guests to enjoy their surprises. I will pop in tomorrow with lots of pictures and a great prize to share. In the meantime, enjoy a little video... Warning, it's good ol' country!


Goodnight! Hope you're enjoying your day, because "I just gotta say, it's a great day to be alive!"

Monday, April 15, 2013

Checking In

April 15th (Happy birthday, Grandpa!) and we are experiencing a crazy snowfall! What?!?! Well, I'm going to make the best of it and craft! I have been working on party preparations (and having lots of fun, too!) Yes, that means it's April and my birthday is coming soon. That also means we'll be having a little bloggy giveaway to celebrate, so stay tuned! Let's get to the fun stuff!


  • Here's some pics from last month freezer cooking day (just in time for this months). David and I prepared 23 meals in one afternoon and I haven't cooked all month. Did I mention how much I love this?! My co-op is cooking next Tuesday. We skipped March, I think every other month might be a good trend.


  • We bought a 4.5 x 3 foot black and white photograph of the Esplanade Riel Pedestrian Bridge here in Winnipeg. We have fallen in love with our city and are so glad someone has captured it so well. You can find it  in store at the Winnipeg IKEA. Pictures don't do it justice!

  • Micah is now 10.5 months!

  • I sewed two Mai Tai baby carriers last month. Here they are.
both mei tai's are reversible and have "baby" appliqued on one side

wrapped and ready to go

  • I am itching to show you party details! I like to surprise my guests, so after the 25th, I'll share. I've been having fun, did I say that already? :)
  • Ever since David assembled the littles' bunk bed, Abby's been begging him to attach the ladder to the top of the bed and let her sleep up there. Well, we've worked out a plan. We'd been having a little visitor in our bed EVERY night for up to 3 hours at a time. Papa loves his cuddle time, but Mama wasn't getting much sleep. Here's the plan: for every night Abby sleeps the whole night in her own bed, she gets a sticker on her chart. When the chart is full, she "wins" the top bunk. We are discovering how incentive driven Abigail is, she has eight stickers already and she began eight days ago. There is one little exception, Friday night is "free" cuddle night. That way we can hold onto our little girl a bit longer and still teach her independence. It seems to be working. Papa is missing his cuddles, though, and crawled into bed with her for a few minutes last night. It didn't last long... it seems that she doesn't like anyone in her space. Funny girl.
this was taken a few days ago on Instagram

  • We got a new printer. She's a beauty and I've been putting her to work for the party. I am easy to please!

Tuesday, April 2, 2013

Triple Bunk Bed - In Progress and Almost Finished


Last week was spring break. We didn't have a lot of plans, but it ended up being a busy week. One of the things that kept us busy was the construction of a triple bunk bed for our littles. I was going to wait to blog about it until it was completely finished, but it's too cool not to share. My David worked hard to make sure it was ready for use by the end of the week and it's a huge hit. We had decided a few months ago that we would like to put all three of our littles into the same room and the best way to accommodate that would be to put in a bunk bed. Micah, of course, is too little for that yet, but it's best to look ahead, especially since they grow so fast. (Micah turned 10 months yesterday and I'm so blown away.) I've seen a lot of bunks and bunk rooms on Pinterest, but it was Samantha's bunk that caught my attention, possibly because her husband was kind enough to create plans for it and I knew my David could totally make one.
Wood purchased and ready to go

David made some changes, as we are in a rental and didn't want to mount the bed to the wall, plus our littles are smaller and needed full railings. I am soooo impressed with how it turned out! We still need to  paint the bed. We picked up a can of paint at Habitat Restore, but it's too cold outside to paint it in the garage, so we will paint it on a day when we can find a sitter for the day. We also need mattresses yet. Currently we have the littles sleeping on air mattresses. Yikes! I had no idea mattresses could be so expensive! Friends of ours are bringing one on Saturday that they are giving to us and we'll just use the air mattress on the other for now. The top bunk won't be in use for some time and that helps us to save for the third mattress.
Frames finished

measuring and pre-drilling the posts

Our Abby practised on the ladder a lot the first day, just so we could be sure she could manage (especially in the night) and she's got it down! Malachi, who is a natural climber, is still needing help and guidance down the ladder. They both love being up high and are just itching to get on the top.

Fitting the posts

Abigail decided to "make her own" bunk and here she is testing it out
Assembled in the bedroom

First night in their new bed (Christmas lights to guide Abby in the night)
Here's what's left to finish: install top bunk ladder, install one more railing (David decided to add a couple more than he originally planned on and we need to put the last one on), get mattresses and prime and paint it. Let's not forget the decorating, this Mama is ridiculously excited about that. I am a little envious of this cool bed! Maybe next spring break, David will build us a bed frame. I have an idea of what I'd like :)