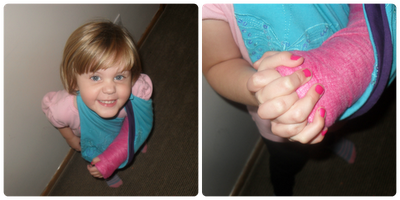
At the hospital, she was told that in a week she would get a new cast and she could pick what colour she'd like it to be. An almost four year old girl, of course, was excited to be getting a pink cast. Her mind was made up. Well at the doctor's appointment, a week a later, he decided that he didn't want to change anything. After a five minute appointment where he had Abigail wiggle and cross her fingers, that was it. I wish you could have seen her face when she looked at me in confusion. Such sad puppy eyes. Thanks for promising my little girl pink and then changing your mind. Grrr. Without skipping much of a beat, I told Abigail that the doctor was happy with how this cast was keeping her arm still for it to heal and I would figure out how to decorate her cast when we got home. A quick stop off at Walmart on the way home was in order. I picked up some Dylon fabric dye and some gauze. I hummed and hawed over how to add sparkle, but I figured that I could work out that little detail at home. (A friend had told us how glitter glue looks pretty on fibreglass casts and we told Dolly we might try it out). Since her plaster cast had been wrapped in gauze when it was put on, I figured I could do the same.
I followed the basic instructions on the packaging. I diluted (maybe half) the package in warm water, added 5 Tbsp of salt and stirred. The gauze sat in the mixture for 45 minutes with intermittent stirring. Since I didn't want to run the washing machine or dishwasher (I considered the dishwasher) just for a little bit of gauze, I decided to hand wash the gauze with dish soap. I then soaked it in vinegar to set the colour and finally rinsed and rinsed and rinsed, until the water ran clear. I hung it to dry and it looked cute. We needed to tape the end when we wrapped it. I didn't have clear tape, so we covered the white tape with pink sharpie. The things we do! That took care of the pink, but we still have sparkle to take care of.
I considered many options, but in the end, I landed on beads. I carefully hand sewed beads on in the shape of a heart. Bling baby!
About the sling... Abigail was given a sling at the hospital, but it was too big and it rubbed her painfully on the neck. I grabbed a scarf from my closet and we made it work, but it was a little awkward. I have fabric and knew it would be nothing to make her a little sling. I grabbed a turquoise jersey fabric with sequinned butterflies and backed it with purple jersey (reversible for a change).
I would say that Abby is sufficiently accessorized now.
Disclaimer: If you dye sterile gauze it is no longer sterile! I used this as a cover only. I do not recommend replacing sterile gauze with dyed gauze. Just in case you were needing to hear me state the obvious!


No comments:
Post a Comment